Pre-Assigning Breakout Rooms in Zoom
Learn how to pre-assign participants to breakout rooms in Zoom both in Canvas and outside of Canvas using Create Rooms or Import from CSV.
Before you start
- Must be a Stevens student, faculty or staff member.
- If you scheduled recurring meetings, the pre-assigned breakout rooms will only work if it's applied to all meetings in the recurrence. You can't edit a single meeting in the recurrence and apply a unique pre-assignment.
- To prepare to use Zoom, access your Stevens Zoom account and install the Zoom desktop client, which offers the best available Zoom experience.
Pre-Assigning Breakout Rooms Using Zoom in Canvas
Step 1: Open the course in Canvas.
Step 2: Select Zoom.
Step 3: Select Schedule a New Meeting and enter the meeting information, such as Topic, When, Duration, etc.
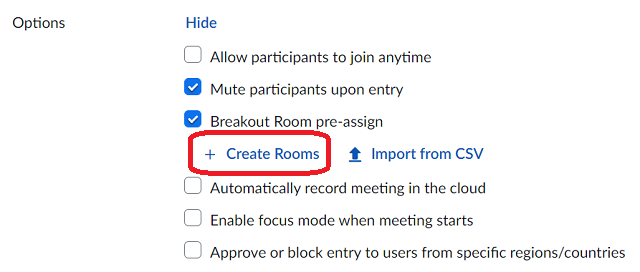
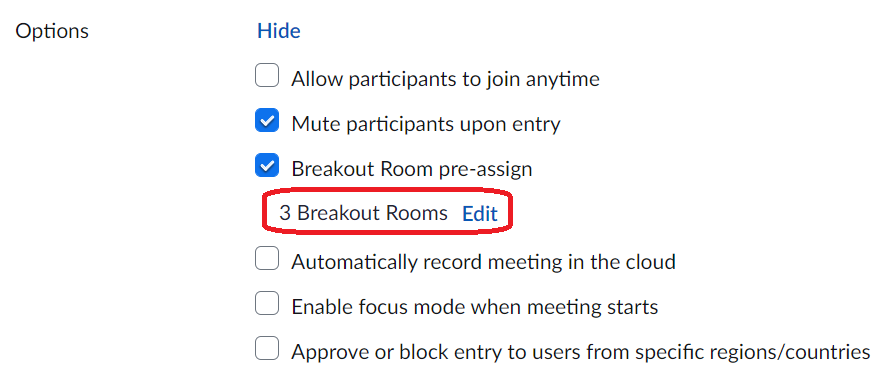
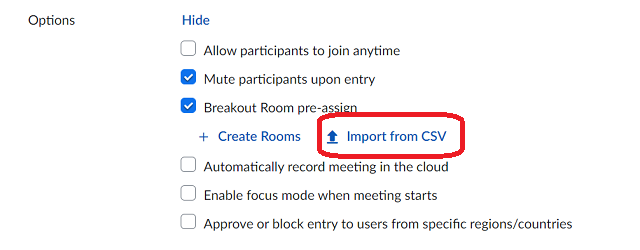
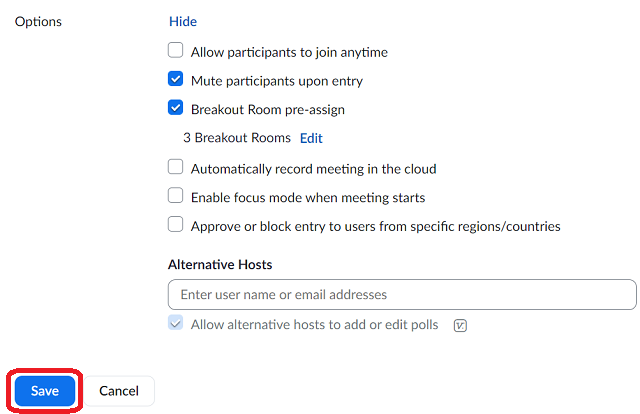
Step 4: In Meeting Options, select Breakout Room pre-assign.

There are two ways to create pre-assigned breakout rooms:
-
Create Rooms: Assign participants to breakout rooms by adding their email addresses
-
Import from CSV: Assign participants to breakout rooms by uploading a CSV file with breakout room name and email address for each participant. To pre-assign participants that are external (non-Stevens) Zoom users such as guest speakers, use the Import from CSV option.
Pre-assigning Breakout Rooms Using Create Rooms
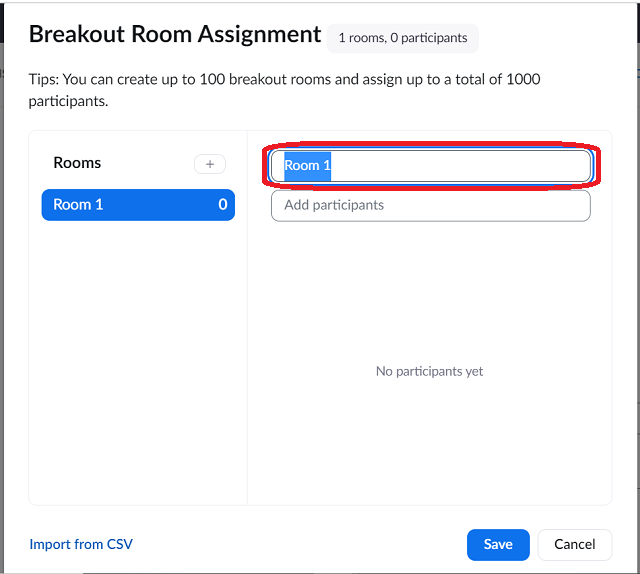
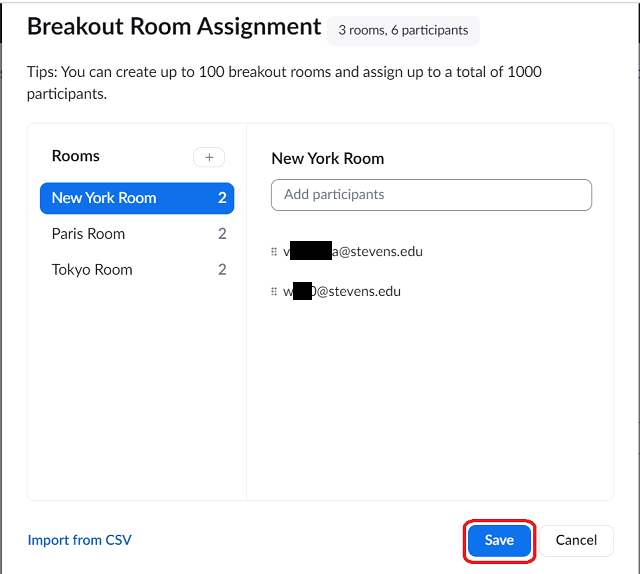
Step 1: Select Create Rooms.

Step 2: To add a room, select the + button.

Step 3: Breakout rooms are named Breakout Room 1, Breakout Room 2, etc. by default. To change breakout room names, select the breakout room name in the Rooms column, then select the room name in the right column. Delete the original name and replace with the new name.

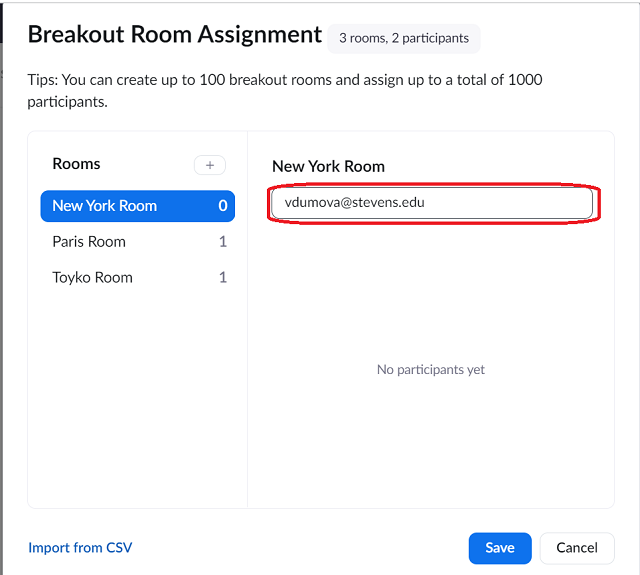
Step 4: To add participants to a breakout room click on the breakout room name in the Rooms column
Step 5: Paste the participant email address in the Add Participant field and use the enter key on your keyboard

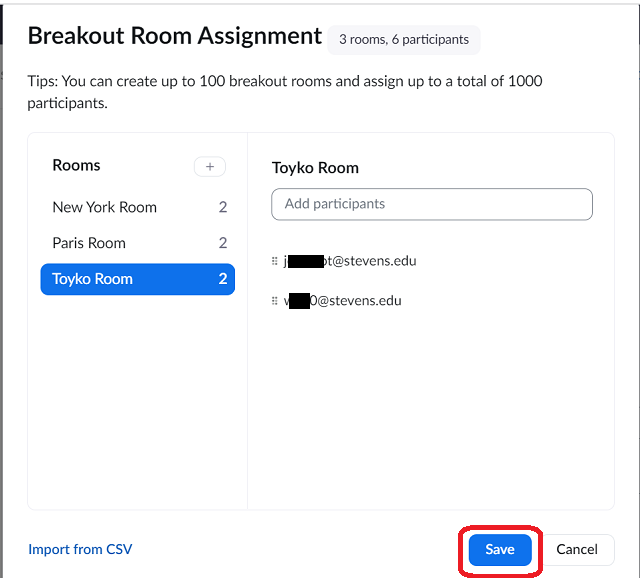
Step 6: Repeat until all participant emails are added to all of the rooms.
Step 7: Once you have created all the breakout rooms and added all participants, select Save.

Step 8: The number of pre-assigned Breakout Rooms you have created will display below Breakout Room pre-assign. To edit these rooms, select Edit.

Step 9: Complete the setup of your Zoom meeting and select Save to save the meeting information.
For additional information about pre-assigning breakout rooms, please see this article.
Pre-assigning Breakout Rooms Using Import from CSV
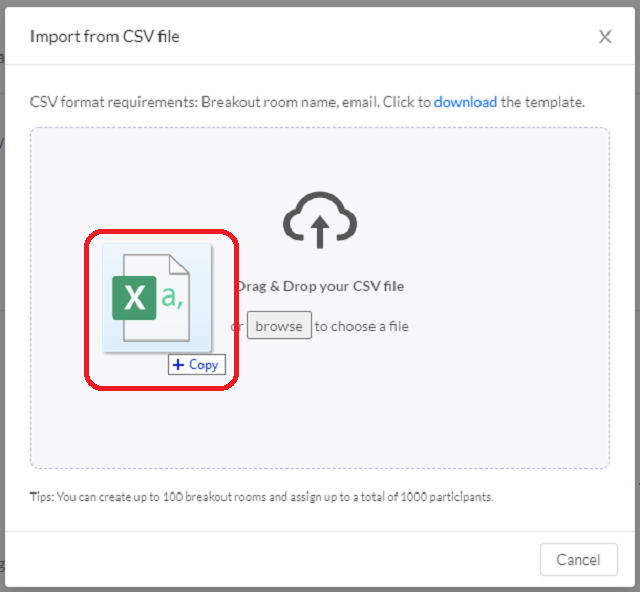
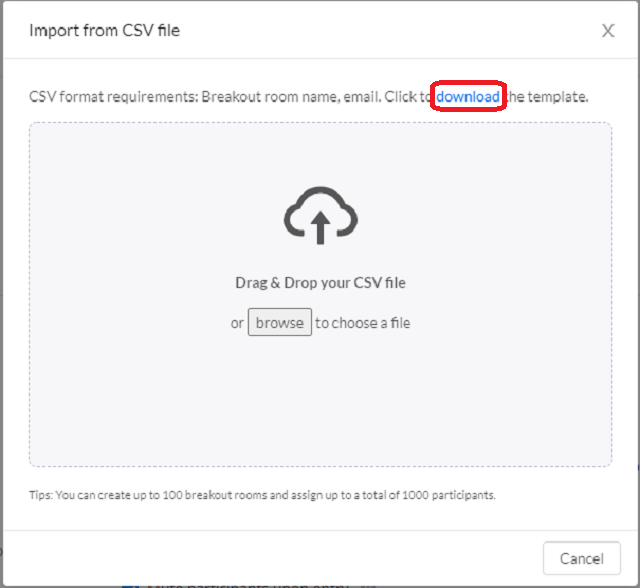
Step 1: Select Import from CSV.

Step 2: Select download to download the template.

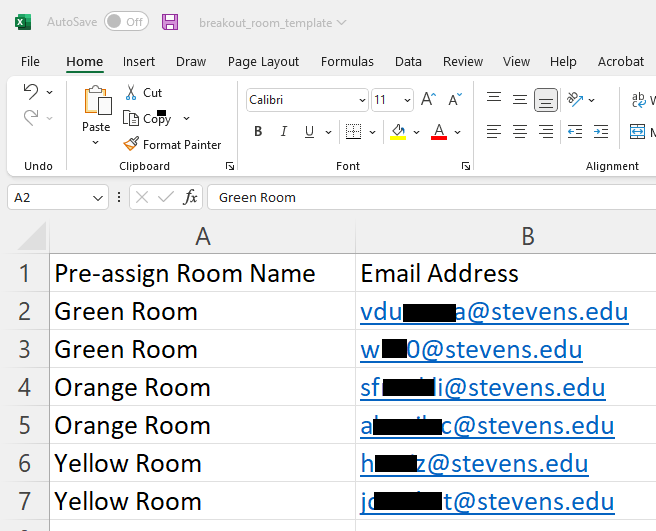
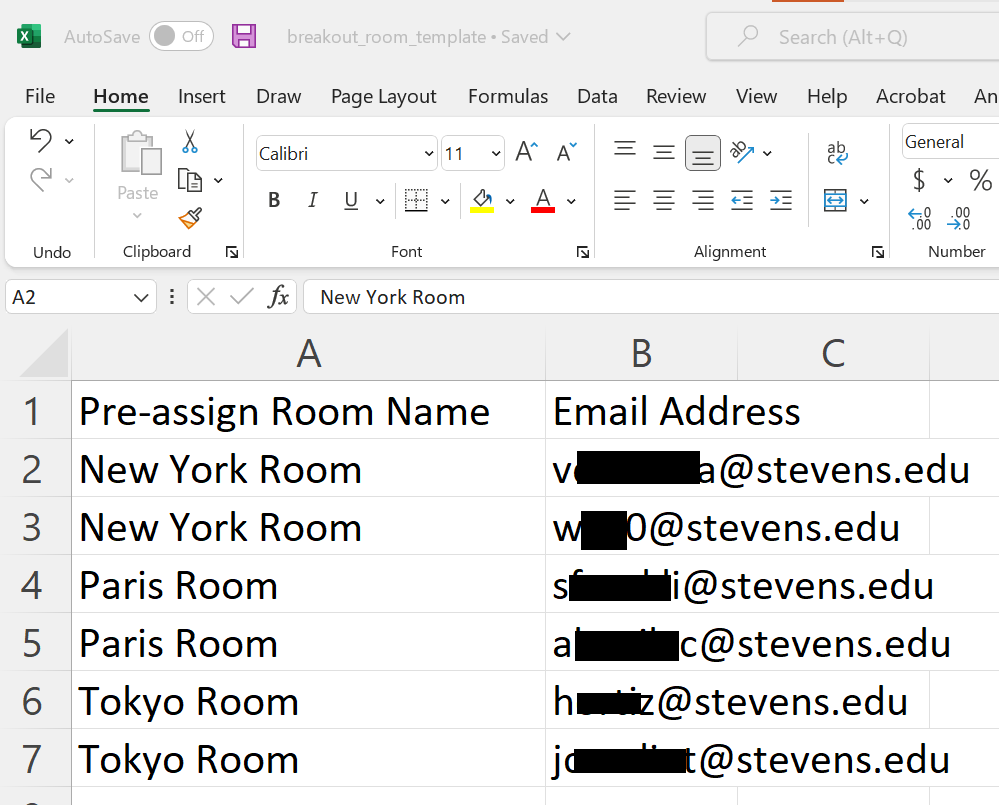
Step 3: In the template, create one row for each participant, with the appropriate breakout room name in column A and the participant’s email in column B.
Do not rename the template file.
Step 4: Drag and drop the CSV file into the Import from CSV file window.
Step 5: The breakout room assignments will be created with the appropriate room names and participants. Select Save.

Step 6: Select Save to save the meeting.

For additional information about pre-assigning breakout rooms, please see this article.
Pre-Assigning Breakout Rooms Using Zoom Outside of Canvas
Step 1: Sign into my.stevens.edu.
Step 2: Select Zoom.
Step 3: Select Schedule a Meeting and enter the meeting information, such as Topic, When, Duration, etc.
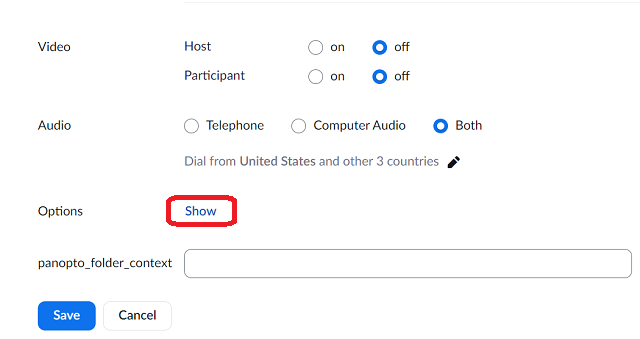
Step 4: In Options, select Show.
Step 5: Select Breakout Room pre-assign.
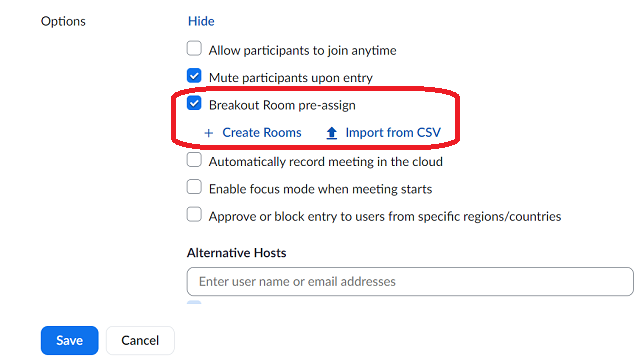
There are two ways to create pre-assigned breakout rooms:
-
Create Rooms: Assign participants to breakout rooms by adding their email addresses.
-
Import from CSV: Assign participants to breakout rooms by uploading a CSV file with breakout room name and email address for each participant.
Pre-assigning Breakout Rooms Using Create Rooms
Step 1: Select Create Rooms.
Step 2: To add a room, select the + button.

Step 3: Breakout rooms are named Room 1, Room 2, etc. by default. To change breakout room names, select the breakout room name in the Rooms column, then select the room name in the right column. Delete the original name and replace with the new name.
Step 4: To add participants to a breakout room click on the breakout room name in the Rooms column.
Step 5: Paste the participant email address in the Add Participant field and use the enter key on your keyboard.
Step 6: Repeat until all participant emails are added to all of the rooms.
Step 7: Once you have created all the breakout rooms and added all participants, select Save.
Step 8: The number of pre-assigned Breakout Rooms you have created will display below Breakout Room pre-assign. To edit these rooms, select Edit.
Step 9: Complete the setup of your Zoom meeting and select Save to save the meeting information.
For additional information about pre-assigning breakout rooms, please see this article.
Pre-assigning Breakout Rooms Using Import from CSV
Step 1: Select Import from CSV.
Step 2: Select download to download the template.
Step 3: In the template, create one row for each participant, with the appropriate breakout room name in column A and the participant’s email in column B.
Do not rename the template file.
Step 4: Drag and drop the CSV file into the Import from CSV file window.
Step 5: The breakout room assignments will be created with the appropriate room names and participants. Select Save.
Step 6: Select Save to save the meeting.
For additional information about pre-assigning breakout rooms, please see this article.
Placing Participants into Pre-Assigned Breakout Rooms During a Zoom Meeting
Step 1: Start the Zoom meeting.
Step 2: Click Breakout Rooms in the meeting controls to access the breakout rooms you created.
Step 3: Click Open All Rooms to start the breakout rooms.
For additional information about using Zoom breakout rooms, please see this article.
Experiencing an issue or need additional support? Contact our OneIT Team by